


Digitizing for Embroidery Turning Artwork into Threaded Masterpieces
Embroidery has been around for centuries, but modern technology has taken this ancient craft to a whole new level. Digitizing for embroidery is the process of converting artwork into a digital file that an embroidery machine can read and stitch onto fabric. Its like magicturning logos, illustrations, or even handwritten text into beautifully threaded designs. But how exactly does it work? And what do you need to know before diving into the world ofdigitizing for embroidery?
The Basics of Embroidery Digitizing
At its core, embroidery digitizing is about translating an image into a series of commands that tell an embroidery machine where to place each stitch. Unlike printing, where ink is applied to a surface, embroidery builds up layers of thread to create texture and dimension. This means the digitizing process has to consider factors like stitch type, direction, density, and the order in which stitches are laid down.
If youve ever tried to embroider a complex design by hand, you know how tricky it can be to get every stitch just right. Digitizing simplifies this by automating the process, but it still requires skill and attention to detail. A poorly digitized design can lead to thread breaks, uneven stitching, or a final product that looks nothing like the original artwork.
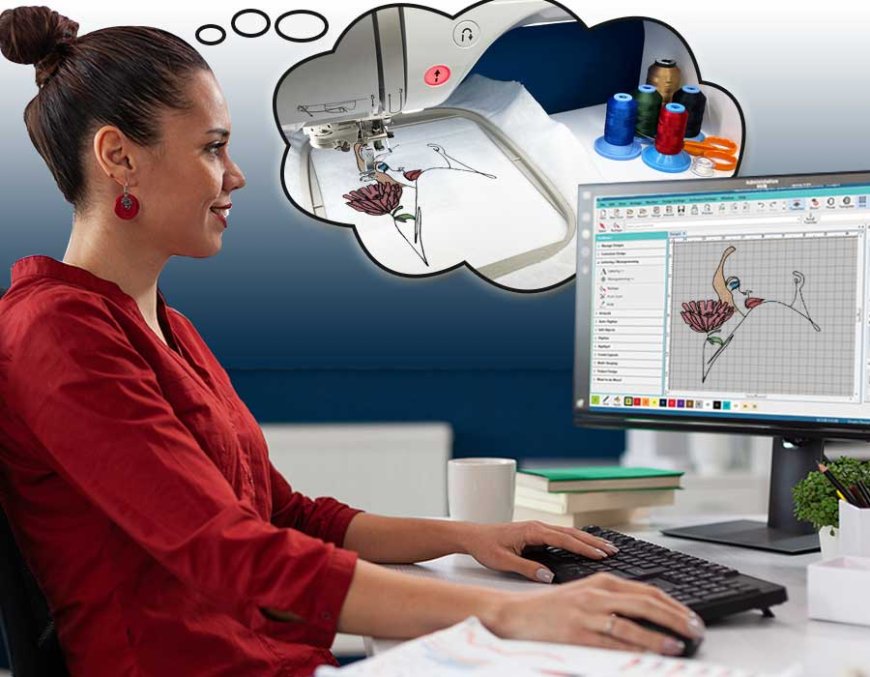
How Digitizing Works
The digitizing process starts with a digital imageusually a vector file (like an AI or EPS) or a high-resolution raster file (like a PNG or JPEG). A digitizer uses specialized software to manually or automatically map out the stitches. Heres a simplified breakdown of the steps:
- Importing the Design The artwork is loaded into embroidery software, where the digitizer can adjust size, orientation, and other basic settings.
- Setting Stitch Types Different parts of the design may require different stitches. Satin stitches are great for fine details and text, while fill stitches cover larger areas.
- Mapping Stitch Direction The way stitches flow can affect the final look. For example, stitching a circle radially (from the center outward) gives a different texture than stitching it in parallel rows.
- Adjusting Density Too many stitches in one area can make the fabric stiff or cause puckering, while too few can leave gaps.
- Adding Underlay Stitches These foundational stitches help stabilize the fabric and prevent distortion when the top stitches are applied.
- Testing the Design Before running a full production, a sample is stitched out to check for errors or adjustments.
While some software offers auto-digitizing features, manual digitizing is almost always better for high-quality results. Auto-digitizing can miss subtle details or create inefficient stitch patterns, leading to a less polished finish.
Choosing the Right File Format
Not all digital files are created equal when it comes to embroidery. Heres what you need to know:
- Vector Files (AI, EPS, SVG) These are ideal because they use mathematical paths rather than pixels, making them infinitely scalable without losing quality. Logos and text often come in vector formats.
- Raster Files (PNG, JPG, BMP) These are made of pixels and can work if theyre high-resolution, but they may need manual cleanup to avoid jagged edges or blurry details.
- Embroidery-Specific Formats (DST, PES, EXP) These are the final output files that embroidery machines read. Each machine brand may prefer a different format, so check your machines requirements.
If youre providing artwork to a digitizer, always send the highest-quality file possible. A blurry logo or low-res image will limit how well it can be translated into stitches.
Common Challenges in Embroidery Digitizing
Even with the best software, digitizing isnt always straightforward. Some common issues include:
- Small Text & Fine Details Tiny letters or intricate lines can get lost in translation. A skilled digitizer knows how to adjust stitch density and type to keep everything legible.
- Gradients & Shadows Unlike printing, embroidery cant blend colors seamlessly. Shading effects must be simulated using different stitch techniques or thread colors.
- Complex Logos Some logos have elements that dont translate well to thread. Simplifying certain parts may be necessary for a clean finish.
- Fabric Choice Matters Stitching on a stretchy t-shirt requires different settings than stitching on a stiff cap. The digitizer must account for how the fabric behaves under the needle.
DIY vs. Professional Digitizing
If youre just starting out, you might wonder whether to digitize your own designs or hire a professional. Heres the breakdown:
- DIY Digitizing There are affordable software options (like Hatch, Embrilliance, or Ink/Stitch) that let you try digitizing yourself. This is great for hobbyists or small projects, but theres a learning curve. Expect some trial and error before your designs stitch out perfectly.
- Professional Digitizing For businesses or high-quality projects, hiring an experienced digitizer is worth the investment. Theyll optimize the design for your specific fabric and machine, saving you time and materials in the long run.
Tips for Better Embroidery Digitizing
Whether youre doing it yourself or working with a pro, these tips can help improve your results:
- Keep It Simple Overly complicated designs can become messy when stitched. Clean, bold lines usually work best.
- Mind the Size A design that looks great at 4 inches might not work at 1 inch. Adjust stitch density accordingly.
- Use the Right Thread & Needle Thicker threads need different settings than fine threads. The same goes for needle size.
- Test on Scrap Fabric Always stitch a sample before committing to the final product. This helps catch any issues early.
The Future of Embroidery Digitizing
As technology advances, so does embroidery digitizing. Machine learning and AI are starting to play a role in auto-digitizing, making the process faster and more accessible. Some software now offers real-time previews, letting you see how stitches will look before sending the file to the machine.
Another exciting development is 3D embroidery, where padded stitches create raised textures for a more tactile finish. This technique is popular in sports logos and high-fashion designs.
Final Thoughts
Digitizing for embroidery bridges the gap between traditional craftsmanship and modern technology. Its what allows businesses to brand uniforms with crisp logos, lets artists turn illustrations into wearable art, and gives hobbyists the ability to personalize everything from hats to quilts.
While the process can be technical, the results are worth ittransforming flat artwork into textured, dimensional pieces that last. Whether youre a beginner experimenting with your first design or a business looking for professional-grade digitizing, understanding the basics will help you make the most of this craft.
So next time you see an embroidered patch or a monogrammed jacket, youll know exactly what went into making ita blend of creativity, precision, and a little bit of digital magic.